Subscribe:

Pages

Showing posts with label DIY. Show all posts

Wednesday, October 23, 2013

West Elm + Me in NYC! You're Invited!!

Ready for the Holidays?

I'd love to INVITE you guys to join me at West Elm for a DIY project I'll be hosting! Come have fun, get creative & enjoy some sweet treats + a SURPRISE giveaway!  You don't want to miss it!  It will all go down on:
 
Here's the official invite below created by West Elm!


YOU CAN RSVP HERE


-images & styling by jen ramos


https://sexygirlspic79.blogspot.com/2013/10/west-elm-me-in-nyc-you-invited.html

Thursday, October 17, 2013

DIY: Rockstar Pumpkin

I posted this cute little Rockstar Pumpkin on my Instagram not long ago & it got a lot of great feedback! So I thought, why not turn this into a little DIY feature? It's so easy.

Pumpkin decorating is essential for Fall – it's a great accessory to keep around the house, whether at a desk or a dinner setting during the Holidays. The best part is, you can't do it wrong! You can decorate your pumpkin however YOU want! So, if you're inspired by my Rockstar Pumpkin, and want to give it a shot – I've prepared some easy-to-follow instructions:


WHAT YOU WILL NEED:
  • Pumpkin – I used a 5" one, but the size is completely up to you!
  • White acrylic paint – I used Liquitex® Basics from Michael's
  • Foam Brush – you can find a similar brush that I used here
  • Golden Pyramid Brass Studs – I used these 3/8" studs, but sizes vary!
  • A sheet or old fabric you don't mind getting paint on!

HOW TO ROCKSTAR PUMPKIN:
  • Begin by simply painting your pumpkin in its entirety. I chose white because I like how the white and golden studs looked together, but you can choose whatever color speaks to you!

    The size of your brush should depend on the size of your pumpkin. The bigger the pumpkin, the bigger the brush should probably be to make the process easier. A smaller brush should be used around the bottom of the stem to avoid getting any paint on it. Careful – that area is tricky!

  • I'd suggest 3 coats of paint but wait a few hours in between in each. After the paint on your pumpkin has dried, it's time to apply the studs! I used the Medium 3/8" studs, but you can choose whichever size you'd like. If you want a more "flashy" pumpkin, you can go ahead with bigger studs!
  • Push in the studs wherever you'd like. I scattered mine around the circumference of the pumpkin – play around and see as you go to decide whether you want more or less. You can also arrange the studs to spell out a word or create a shape!

  • Ta da! You have your pumpkin!! Use it to add a touch of fun to your desk like I did, or display it on the table at your next dinner party. Enjoy.

Maybe next time I'll try adding a mohawk. Ha.


- images by jen ramos


https://sexygirlspic79.blogspot.com/2013/10/diy-rockstar-pumpkin.html

Wednesday, April 10, 2013

DIY: Trim Wrap Bracelet

Hi, it's Stephanie from Henry Happened back with another DIY. I did tell you I loved bracelets, right? Well, I wasn't lying! Read on for the tutorial on how to make the easiest wrap bracelet ever. These DIY bracelets are great for teenagers!

 AZ0A1643 

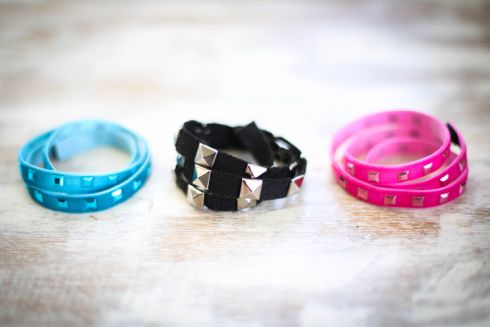
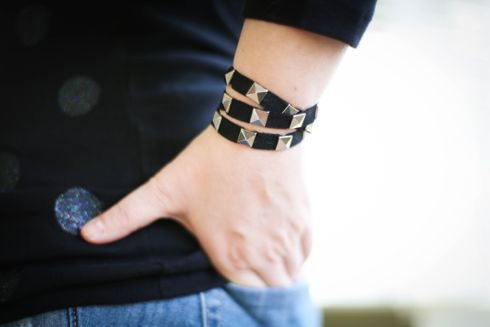
 Have you ever roamed the trim section at JoAnns? No?! Well, you might be surprised at the selection of ribbon, lace, and even fur trim you can find. The bright colors of this trim called to me (yes, it even has studs!) so naturally I found a way to make it into a simple wrapped bracelet. 

IMG_3872 

What you'll need for your own wrap bracelet:
  • About 1/2 a yard of whatever trim you like. Go with a neon studded one or try a Greek key, floral or Baroque pattern. I'm telling ya - there's a ton to choose from!
  • Sticky back Velcro
  • Scissors
IMG_3875 

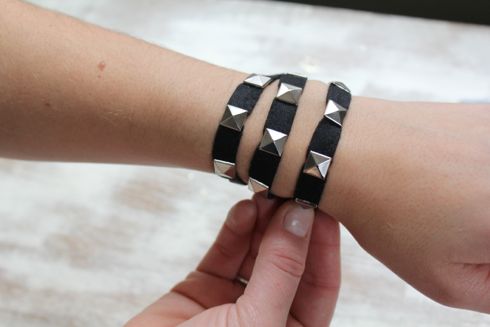
First, measure your wrist with the trim. I like a 3 wrap bracelet but position it how you like it on your arm and then cut the length. 

IMG_3877 
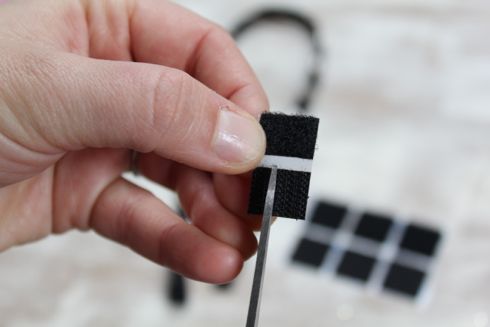
Then take the Velcro and cut a piece to fit the size of your trim. 
 IMG_3878 

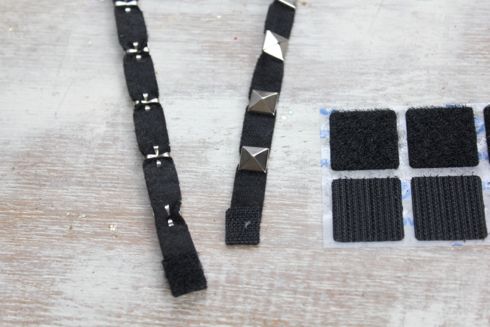
Attach the sticky side to each end of the trim, and, voila!, you are done. The Velcro closure is a bit of a miracle because I can never manage to get my bracelets on with one hand. Please tell me I'm not the only one? 

AZ0A1642 

Wear the bracelets on their own or make a couple and stack them together.

 IMG_9236 

What kind of bracelet stack are you planning to wear this spring?


-post and images by stephanie gerber


https://sexygirlspic79.blogspot.com/2013/04/diy-trim-wrap-bracelet.html

Friday, February 15, 2013

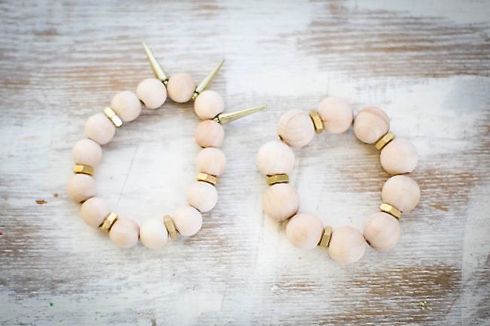
DIY: Bead and Hardware Bracelet

Hello Made by Girl readers! It's Stephanie from Henry Happened back with another DIY project. If there's one thing I love, it's making bracelets. 

And these are so insanely easy you won't be able to make just one. Read on for the how-to! 

AZ0A1656 AZ0A1727 

With spring soon upon us I wanted a bracelet that was light, simple and stackable. Doesn't this time of year make you want to clean out all the closets and purge everything? 

When you're spring cleaning you might just find you already have most of the materials you need for this DIY. If not, it's a good excuse for a trip to Home Depot.

DIY Bead and Hardware Bracelets

IMG_3879 

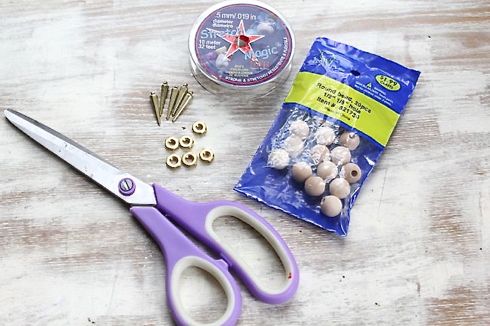
To make your own bracelets you will need:
  • Stretch Magic (found at any craft store)
  • Small wooden beads (Hobby Lobby is my favorite source for these)
  • 8mm gold hex nuts
  • Gold spikes are optional but make a fun addition
  • Scissors
AZ0A1729
IMG_3452 

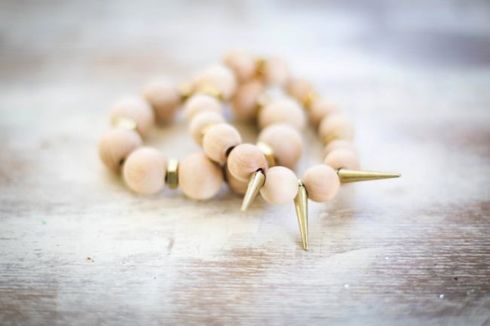
Start by stringing your beads and hex nuts onto the Stretch Magic. This stuff is super easy to work with. It feels kind of like fishing line but with stretch. My pattern was two beads followed by a hex nut, using about 10 beads. 

Measure your wrist to make it the length you need. Give it a bit of extra room though so it's not too tight. If it's too small the beads will stretch apart too much, exposing the cord.

 IMG_3456 

Once you are done stringing cut the Stretch Magic and knot it. Follow the package directions on making the knots because you don't want it to come undone.

 IMG_3458 

Clip the ends and you're done! Then you'll say, 'That was so easy, let's make more!' And before you know it, you're addicted to making bracelets. There really ought to be a hotline for that. 

AZ0A1655 

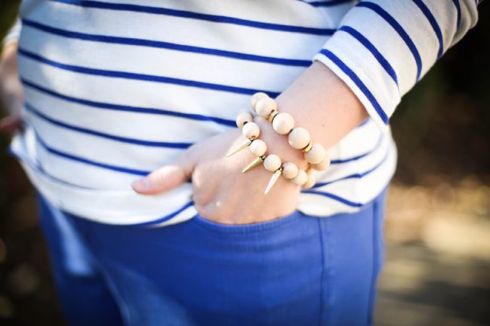
You can make all kinds of patterns with the beads and hex nuts. And definitely add some spikes for a little edge. You can't go wrong with spikes, right?


 -images Stephanie Gerber


https://sexygirlspic79.blogspot.com/2013/02/diy-bead-and-hardware-bracelet.html

Friday, January 18, 2013

Contributors Wanted

This Friday we are .....


I have to say, working with contributors has been a great experience. I've made some great friends in the process & hopefully the ladies got some great traffic out of it as well.  With that said, it's that time again to switch out the current contributors & bring in new FRESH FACES & posts! I'm always super busy managing my MBG Shop, painting for my Cocoa & Hearts gallery, marketing, answering e-mail & maintaining my personal life. It's STILL a lot of work, so I'm back searching for the next contributors!
 

I'd love to recruit 5-6 contributors to blog here on Made By Girl!  It's not going to be an easy task - but I'll choose bloggers for each category below. Categories are:
 

  • Decor/Interior Design
  • Fashion/Beauty
  • DIY
  • Food


Below I've outlined more details & what I'm looking for.
 

HOW OFTEN WILL YOU POST:1-2x per month for 6 months. 

EXPERIENCE: 

Yes - Must have an active/updated blog. I'm looking for bloggers who have some knowledge of programs like Photoshop & have a 'similar aesthetic' as Made By Girl. The posts you write for MBG cannot be posted on your own blog, but you can link to it from your blog.


WILL THERE BE COMPENSATION: 
Not at this time. But it's a great chance to gain more exposure and collaborate with MBG blog.

BIO PAGES:We'll be adding a page with photos & short bios of all the current contributors - here's an example. .
 
RESOURCES: 
It's very important to credit 'all' images properly.

PRETTY POST PLS: 
I love pretty & interesting posts. So pls put some LOVE into it! 

HOW DO YOU SUBMIT:
If you you want to give this a try, email me  & let me know 'which category' you're interested in. Write 'Contributors' in the email subject pls. ALSO, pls email me your blog so I can see your style! If you submitted last yr. don't be afraid to submit again!
 

WHEN WILL WE SELECT CONTRIBUTORS:
If you don't hear from someone at Made By Girl in about 2-3 weeks from this post, it means someone else was selected.  Unfortunately, we may not be able to respond to everyone. We will post the selected contributors in an upcoming post!


Thanks & looking forward to hearing from you! 

https://sexygirlspic79.blogspot.com/2013/01/contributors-wanted.html

Thursday, January 10, 2013

DIY: Brushstroke Lamp

Hi All MBG Readers, Jana Bek here & I'm so excited to share my brushstroke lamp DIY. My gourd was a sad shade of pink. 

Knowing I needed another layer of pattern for my bedroom, & drawing inspiration from the fabulous Bunny Willams Brushstroke lamp & Kelly Wearstler's killer custom wall paper, I took my little lamp to the next level.


Inspiration:


Materials:

Sad lamp
Spray Primer
Trash Bags
Patience
Paint in Pop hue
Sad, Bismol Pink Lamp:


Initial Steps:
Tie a plastic bag around the cord & the top of the lamp to protect them from primer & paint. Spray first coat of primer, let dry, then sand with fine sand paper. Depending on shade of your lamp, repeat, repeat, & repeat. I had to apply 4 coats of primer, be patient!


Next:
As the primer was white, I choose to paint my pink brushstrokes on the primer as I was OK with the color.


one more look at the inspiration 


Voila! Gorgeous brushstroke lamp!


-Post by Jana Bek
-Images by Erik Melvin


https://sexygirlspic79.blogspot.com/2013/01/diy-brushstroke-lamp.html

Friday, January 4, 2013

DIY: Chalkboard stemware

Hi All MBG Readers, Jana here to share a chic & super simple solution for entertaining: stemware with writable chalkboard bases.  A sophisticated way to distinguish ones champagne cocktail when the event is too engaging to keep track.


Materials:

Stemware
Paint Brush
Chalk


Paint the base. I recommend using short brushstrokes. This layer will be thin as you want just enough coverage to create texture for the second layer. This layer will not look attractive but do not worry, it will turn out!


Let dry overnight. Then paint on a second layer of paint. It will look goopy, but again, do not worry, as it dries the paint settles into the shape of the base.


 Let the second coat dry overnight. Now entertain away!


Something to note - do not get the bases wet as the paint will chip. To preserve, wash only the bowl of the stemware. An upside to the somewhat delicate nature is that you can easily wash all the paint off if you want your stemware only transitioned temporarily. 


-post by Jana Bek
-images by Erik Melvin


https://sexygirlspic79.blogspot.com/2013/01/diy-chalkboard-stemware.html

Monday, December 10, 2012

DIY: Herb Wreath

Hi MBG readers! Jana here today to share a DIY gift for the gourmand in your life - Jen, maybe perfect for your chef hubby?

I stumbled upon the inspiration for this herb wreath when passing through the Tribeca Greenmarket one beautiful fall weekend. I love fresh herbs & have quite a few foodies as friends. They have cooking gadgets galore but, as far as I know, herbs at the ready are a gift any chef would greatly appreciate. The genius of this gift is that when the wreath dries out the herbs are still recipe ready.

Materials:

Herbs (I used Dill, Rosemary, Oregano, & Lavender) (my friend I am gifting this to makes wicked Lavender ice cream!)
Twine
Cardboard


Cut the cardboard into a circle. I traced a 12" dinner plate then cut out the inside for a rough 1/2" edge width. 


Using the twine, tie your herbs into small bundles. The bundle should be not too small, and not too bulky. About 5" long with a 1 1/2" width at center of bundle is a safe starting place.


Tie first bundle onto the cardboard ring.


Now, add bundles by tying successive herb bunches 2" under its preceding bunch (to reduce the amount of visible twine). Alternate herbs. I tied on two bunches of an herb type before I switched onto a new herb.


Once all bundles are tied on, wrap twine over the sections where two bundles overlapped and tie off. This thicker section of twine is a decorative way to secure the herbs in place. 


I finished my wreath off with braiding the twine into a loop and securing to the wreath for ease of hanging in the kitchen. 


Voila, an herb wreath at the ready for the chef who has everything. (Or the hostess that may have forgot that final sprig of rosemary!)


Do you have someone that might relish in this wreath? We would love to know!


-post by Jana Bek
-images by Erik Melvin


https://sexygirlspic79.blogspot.com/2012/12/diy-herb-wreath.html

Thursday, November 15, 2012

DIY: Bridal Shower Favors

Hi All Jana here, 

With my best friend's big day a few weeks away I am enacting all of my maid of honor DIYs in a fast frenzy way. The bride & myself are designing on a dime (who isn't??) so when I thought about bridal shower favors it was a given that I would be DIYing them. 

I had a million ideas - some beautiful, but not so personal; & than others that just seemed too crafty. One Saturday, while I was transitioning my dry-cleaning (silk shirts) onto hangers I had an epiphany - for that gorgeous silk cami that you often get (or give) as a gift that always falls to the floor - you need a hanger that will keep the precious piece in place. Why not showcase the piece? Hence the glam hanger with a practical punch was created.

Materials:


  • Hanger
  • Dazzlers (Rhinestones, Pearls Large & Small)
  • Glue
  • Paint (Gold & your fav color


Paint Hanger Gold


Paint Monogram 


Glue on Dazzlers, alternate pearls & rhinestones to your liking


Volia - statement pieces that stay in place


-images and post by jana bek

-images by Erik melvin


https://sexygirlspic79.blogspot.com/2012/11/diy-bridal-shower-favors.html